반응형

# INSTANCE NAME/ DB NAME을 확인하고 싶은데 권한이 없는 일반 유저가 확인하고 싶을때 가능
 - SYS_CONTEXT 함수는 세션정보를 얻어오는 함수 입니다.
 - USERENV : 현재 세션의 환경정보를 반환는 네임스페이스 입니다.
   SYS_CONTEXT ('namespace', 'parameter')

Oracle Docs : http://docs.oracle.com/cd/E11882_01/olap.112/e23381/row_functions079.htm


1
2
3
4
5
6
7
8
9
10
11
12
13
14
15
16
17
18
19
20
21
22
23
24
25
26
27
28
29
30
31
32
33
34
35
36
37
38
39
40
41
42
43
44
45
46
47
48
49
50
-- DB 이름
SELECT SYS_CONTEXT('userenv', 'db_name') db_name FROM DUAL;
DB_NAME
------------
oracle3
 
-- Instance 이름
SELECT SYS_CONTEXT('userenv', 'instance_name') instance_name FROM DUAL;
INSTANCE_NAME
------------------
oraSub3
 
-- 접속자 IP 주소
SELECT SYS_CONTEXT('USERENV','IP_ADDRESS') "My IP Address"  FROM DUAL;
 
-- DBA 여부
SELECT SYS_CONTEXT('USERENV','ISDBA') isdba FROM DUAL;
ISDBA
-------
TRUE
 
 
SELECT SYS_CONTEXT('USERENV','TERMINAL') terminal FROM DUAL;
SELECT SYS_CONTEXT('USERENV','LANGUAGE') language FROM DUAL;
SELECT SYS_CONTEXT('USERENV','SESSIONID') sessionid FROM DUAL;
SELECT SYS_CONTEXT('USERENV','INSTANCE') instance FROM DUAL;
SELECT SYS_CONTEXT('USERENV','ENTRYID') entryid FROM DUAL;
SELECT SYS_CONTEXT('USERENV','ISDBA') isdba FROM DUAL;
SELECT SYS_CONTEXT('USERENV','NLS_TERRITORY') nls_territory FROM DUAL;
SELECT SYS_CONTEXT('USERENV','NLS_CURRENCY') nls_currency FROM DUAL;
SELECT SYS_CONTEXT('USERENV','NLS_CALENDAR') nls_calendar FROM DUAL;
SELECT SYS_CONTEXT('USERENV','NLS_DATE_FORMAT') nls_date_format FROM DUAL;
SELECT SYS_CONTEXT('USERENV','NLS_DATE_LANGUAGE') nls_date_language FROM DUAL;
SELECT SYS_CONTEXT('USERENV','NLS_SORT') nls_sort FROM DUAL;
SELECT SYS_CONTEXT('USERENV','CURRENT_USER') current_user FROM DUAL;
SELECT SYS_CONTEXT('USERENV','CURRENT_USERID') current_userid FROM DUAL;
SELECT SYS_CONTEXT('USERENV','SESSION_USER') session_user FROM DUAL;
SELECT SYS_CONTEXT('USERENV','SESSION_USERID') session_userid FROM DUAL;
SELECT SYS_CONTEXT('USERENV','PROXY_USER') proxy_user FROM DUAL;
SELECT SYS_CONTEXT('USERENV','PROXY_USERID') proxy_userid FROM DUAL;
SELECT SYS_CONTEXT('USERENV','DB_DOMAIN') db_domain FROM DUAL;
SELECT SYS_CONTEXT('USERENV','DB_NAME') db_name FROM DUAL;
SELECT SYS_CONTEXT('USERENV','HOST') host FROM DUAL;
SELECT SYS_CONTEXT('USERENV','OS_USER') os_user FROM DUAL;
SELECT SYS_CONTEXT('USERENV','EXTERNAL_NAME') external_name FROM DUAL;
SELECT SYS_CONTEXT('USERENV','IP_ADDRESS') ip_address FROM DUAL;
SELECT SYS_CONTEXT('USERENV','NETWORK_PROTOCOL') network_protocol FROM DUAL;
SELECT SYS_CONTEXT('USERENV','BG_JOB_ID') bg_job_id FROM DUAL;
SELECT SYS_CONTEXT('USERENV','FG_JOB_ID') fg_job_id FROM DUAL;
SELECT SYS_CONTEXT('USERENV','AUTHENTICATION_TYPE') FROM DUAL;


출처 : http://develop.sunshiny.co.kr/681


반응형
반응형

SELECT b.username "Oracle User", a.spid "Unix PID", b.SID "Oracle Sid",

       b.serial# "Oracle Serial", b.osuser "OS User", b.machine "Computer",

       b.program "Program",

       TO_CHAR (logon_time, 'HH24:MI:SS,yyyy/mm/dd') "Login Time",

       b.action "Session Action", c.action "SQL Action", lockwait "LockWait",

       status "Status", optimizer_cost "Optimizer_cost",

       c.sql_text "SQL Text"

  FROM v$process a, v$session b, v$sql c

 WHERE

       --spid=&PID and

       a.addr = b.paddr

   AND b.sql_address = c.address

   AND b.sql_hash_value = c.hash_value;


-----------------

SELECT b.username "Oracle User", b.SID "Oracle Sid",

       b.serial# "Oracle Serial", b.osuser "OS User", b.machine "Computer",

       b.program "Program",

       TO_CHAR (logon_time, 'HH24:MI:SS,yyyy/mm/dd') "Login Time",

       b.action "Session Action", c.action "SQL Action", lockwait "LockWait",

       status "Status", optimizer_cost "Optimizer_cost",

       c.sql_text "SQL Text"

  FROM v$session b, v$sql c

 WHERE b.sql_address = c.address AND b.sql_hash_value = c.hash_value;


 ----------------


 SELECT BS.USERNAME "Blocking User",


BS.USERNAME "DB User",


WS.USERNAME "Waiting User",


BS.SID "SID",


WS.SID "WSID",


BS.SERIAL# "Serial#",


BS.SQL_ADDRESS "address",


BS.SQL_HASH_VALUE "Sql hash",


BS.PROGRAM "Blocking App",


WS.PROGRAM "Waiting App",


BS.MACHINE "Blocking Machine",


WS.MACHINE "Waiting Machine",


BS.OSUSER "Blocking OS User",


WS.OSUSER "Waiting OS User",


BS.SERIAL# "Serial#",


WS.SERIAL# "WSerial#",


DECODE(WK.TYPE,'MR','Media Recovery',


'RT','Redo Thread',


'UN','USER Name',


'TX','Transaction',


'TM','DML',


'UL','PL/SQL USER LOCK',


'DX','Distributed Xaction',


'CF','Control FILE',


'IS','Instance State',


'FS','FILE SET',


'IR','Instance Recovery',


'ST','Disk SPACE Transaction',


'TS','Temp Segment',


'IV','Library Cache Invalidation',


'LS','LOG START OR Switch',


'RW','ROW Wait',


'SQ','Sequence Number',


'TE','Extend TABLE',


'TT','Temp TABLE',


WK.TYPE) LOCK_TYPE,


DECODE(HK.LMODE,0,'None',


1,'NULL',


2,'ROW-S (SS)',


3,'ROW-X (SX)',


4,'SHARE',


5,'S/ROW-X (SSX)',


6,'EXCLUSIVE',


TO_CHAR(HK.LMODE)) MODE_HELD,


DECODE(WK.REQUEST,0,'None',


1,'NULL',


2,'ROW-S (SS)',


3,'ROW-X (SX)',


4,'SHARE',


5,'S/ROW-X (SSX)',


6,'EXCLUSIVE',


TO_CHAR(WK.REQUEST)) MODE_REQUESTED,


TO_CHAR(HK.ID1) LOCK_ID1,


TO_CHAR(HK.ID2) LOCK_ID2,


DECODE(HK.BLOCK,0,'NOT Blocking', /* Not blocking any other processes */


1,'Blocking', /* This lock blocks other processes */


2,'Global', /* This lock is global, so we can't tell */


TO_CHAR(HK.BLOCK)) BLOCKING_OTHERS


FROM V$LOCK HK,


V$SESSION BS,


V$LOCK WK,


V$SESSION WS


WHERE HK.BLOCK = 1


AND HK.LMODE != 0


AND HK.LMODE != 1


AND WK.REQUEST != 0


AND WK.TYPE (+) = HK.TYPE


AND WK.ID1 (+) = HK.ID1


AND WK.ID2 (+) = HK.ID2


AND HK.SID = BS.SID (+)


AND WK.SID = WS.SID (+)


AND (BS.USERNAME IS NOT NULL)


AND (BS.USERNAME <> 'SYSTEM')


AND (BS.USERNAME <> 'SYS')


ORDER BY 1;


------------


SELECT c.owner, c.object_name, c.object_type,

       fu.user_name locking_fnd_user_name,

       fl.start_time locking_fnd_user_login_time, vs.module, vs.machine,

       vs.osuser, vlocked.oracle_username, vs.SID, vp.pid,

       vp.spid AS os_process, vs.serial#, vs.status, vs.saddr, vs.audsid,

       vs.process

  FROM fnd_logins fl,

       fnd_user fu,

       v$locked_object vlocked,

       v$process vp,

       v$session vs,

       dba_objects c

 WHERE vs.SID = vlocked.session_id

   AND vlocked.object_id = c.object_id

   AND vs.paddr = vp.addr

   AND vp.spid = fl.process_spid(+)

   AND vp.pid = fl.pid(+)

   AND fl.user_id = fu.user_id(+)

   AND c.object_name LIKE '%' || UPPER ('&tab_name_leaveblank4all') || '%'

   AND NVL (vs.status, 'XX') != 'KILLED'; --<-change it 

반응형
반응형

http://www.ex-em.com/web/research/research_pub.php

출처: http://exem.tistory.com/891 [엑셈 이야기]

출처: http://exem.tistory.com/891 [엑셈 이야기]


SQL튜닝의 시작 사용_SQL.zip


반응형
반응형


XRDP란 오픈소스인 Remote Desktop Protocol Server를 말합니다.


즉, 윈도우즈 머신로부터 당신의 리눅스 서버까지 RDP를 통해 접속가능합니다.

=> MSTSC를 통한 접속이 가능합니다.


CENTOS 7로 XRDP를 통한 접속을 위한 설치 방식을 설명합니다.


사전 준비 :


1. 사전에 CENTOS 7에 GNOME를 설치하세요


(관련 URL : http://www.itzgeek.com/how-tos/linux/centos-how-tos/install-gnome-gui-on-centos-7-rhel-7.html)


설정:


1. 저장소를 신규로 설정합니다.


# vi /etc/yum.repos.d/xrdp.repo 


위의 파일 안에 다음의 내용을 입력합니다.

[xrdp]
name=xrdp
baseurl=http://li.nux.ro/download/nux/dextop/el7/x86_64/
enabled=1
gpgcheck=0 


설치:

1. 다음의 명령을 실행하여 위의 선언한 xrdp 저장소로부터 읽어들여 설치합니다.


# yum -y install xrdp tigervnc-server


다음과 같은 결과가 나오면서 새로 생성된 저장소로 부터 패키지를 가지고 오고 있는지 확인하십시오


 --> Running transaction check
---> Package xrdp.x86_64 0:0.6.1-2.el7.nux will be installed
--> Finished Dependency Resolution
 
Dependencies Resolved
 
================================================================================
Package        Arch             Version                   Repository      Size
================================================================================
Installing:
xrdp           x86_64           0.6.1-2.el7.nux           xrdp           271 k
 
Transaction Summary
================================================================================
Install  1 Package
 
Total download size: 271 k
Installed size: 1.5 M
Is this ok [y/d/N]
Downloading packages:
xrdp-0.6.1-2.el7.nux.x86_64.rpm                            | 271 kB   00:05
Running transaction check
Running transaction test
Transaction test succeeded
Running transaction
Installing : xrdp-0.6.1-2.el7.nux.x86_64                                  1/1
Verifying  : xrdp-0.6.1-2.el7.nux.x86_64                                  1/1
 
Installed:
xrdp.x86_64 0:0.6.1-2.el7.nux


설치가 완료되면 XRDP 서비스를 시작합니다

# systemctl start xrdp.service 


xrdp는 기본 3389 포트를 사용합니다.

※ 만약 변경하고자 할때는 /etc/xrdp/xrdp.ini의 port의 값을 변경하면 됩니다.


서비스가 동작중인지 확인합니다.(아래는 3389로 동작하고 있음)


 # netstat -antup | grep xrdp
tcp 0 0 0.0.0.0:3389 0.0.0.0:* LISTEN 1508 / xrdp
tcp 0 0 127.0.0.1:3350 0.0.0.0:* LISTEN 1507 / xrdp-sesman


CENTOS 7에서는 기본적으로 재부팅후에 자동으로 서비스가 시작되지 않습니다.

따라서 아래와 같은 명령을 통해 자동 시작기능을 설정합니다.

# systemctl enable xrdp.service 


외부 기기에서 rdp 연결을 허용하는 iptables 규칙을 작성하는 것입니다. (tcp 3389 포트를 예외로 설정함)

# firewall-cmd --permanent --zone=public --add-port=3389/tcp
# firewall-cmd --reload 


SELinux 구성

# chcon --type=bin_t /usr/sbin/xrdp
# chcon --type=bin_t /usr/sbin/xrdp-sesman 


테스트 :


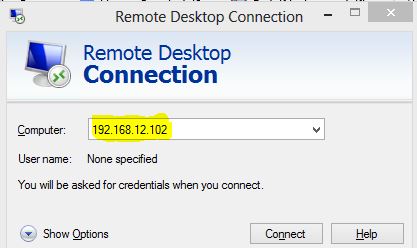
아래와 같이 mstsc를 통한 대상 서버 접속을 합니다.


CentOS 7 - xrdp MSTSC


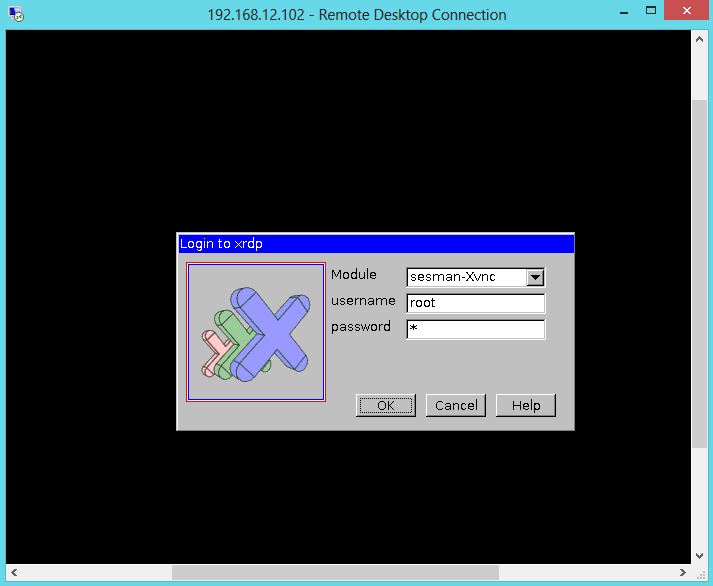
사용자 이름과 암호를 입력하라는 메시지가 표시됩니다. root 또는 시스템에있는 사용자를 사용할 수 있습니다. "sesman-Xvnc"모듈을 사용해야합니다.


CentOS 7 - xrdp 로그인 페이지


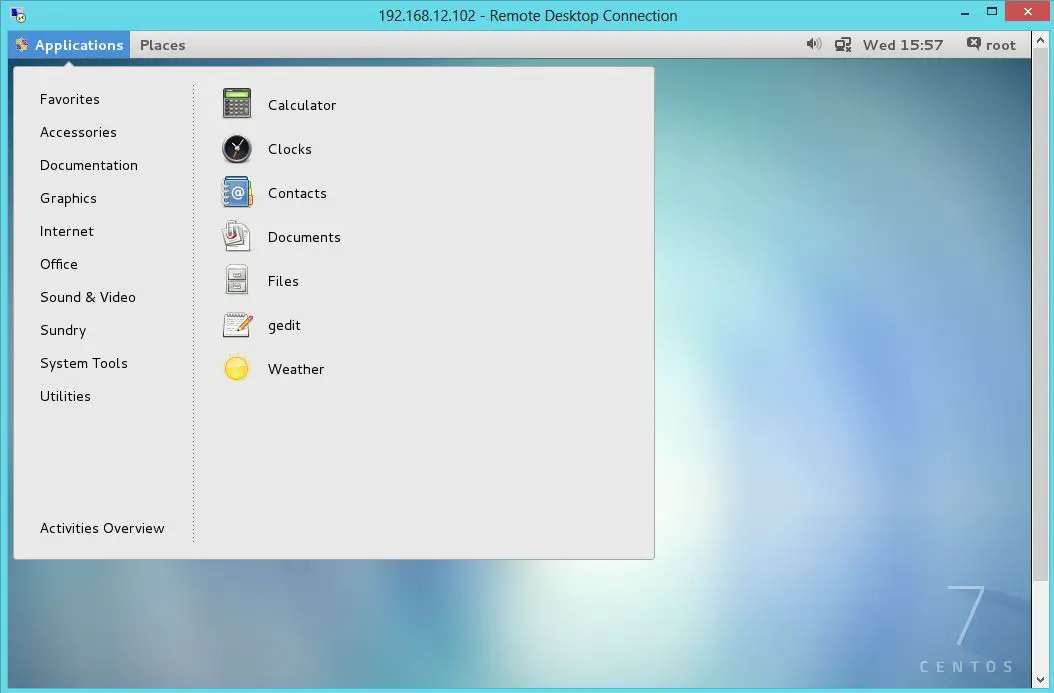
확인을 클릭하면 처리가 표시됩니다. 30 분 안에 데스크 탑을 연결을 얻게 됩니다.


CentOS 7 - xrdp 데스크탑


출처 : http://www.itzgeek.com/how-tos/linux/centos-how-tos/install-xrdp-on-centos-7-rhel-7.html

반응형

'OS > Linux' 카테고리의 다른 글

Centos 7 SAMBA 설정  (1) 2019.09.05
vi 색상 표기  (0) 2019.05.08
리눅스 백업 및 복구  (0) 2013.01.25
삼성 컴퓨터 유분투 설치기.  (0) 2012.02.06
rkhunter (리눅스 침입 탐지 사용하기)  (1) 2010.10.14
반응형

DAMO.SECURE_COLUMN_INFO


테이블의 KEY 값이 동일해야 동일한 데이터가 조회된다.


발생하는 에러

ORA-20900 : (테이블명.컬럼명) 복호화 도중에 에러가 발생하였습니다.

ORA-06512 : "DAMO.SECURE_ACCESS", 줄 4498에서

ORA-06512 : "DAMO.SECURE_EXTCALL", 줄 443에서

반응형

'Database' 카테고리의 다른 글

무료 DB 접근 툴  (0) 2019.08.19
무료 ERD 툴 ERMASTER  (0) 2019.08.08
Sybase IQ Administrator 사용 Script  (0) 2012.10.18
JNDI Log4SQL 적용 예...  (0) 2011.04.21
SQL LITE 사용 프로그램  (0) 2010.04.14
반응형


:PNT


echo "test print"


rem 백그라운드로 putty의 60 인 저장된 세션 실행

start /b putty -load 60

start /b putty -load 61


rem 600초 대기

timeout /t 600


rem 프로세스 강제 종료

taskkill /F /IM putty.exe


cls

goto PNT


반응형
반응형


ORA-27086: unable to lock file - already in use

In Alert log :

Thu Feb 14 09:34:57 EST 2013
Errors in file /u01/app/oracle/admin/rdmetdev/udump/rdmetdev_ora_6321.trc:
ORA-27050: function called with invalid FIB/IOV structure
Additional information: 2
ORA-27086: unable to lock file - already in use
Linux-x86_64 Error: 37: No locks available
Additional information: 10

usually this problem occurred because NFS is Hanged,and can check OS logs to find "statd: server localhost not responding, timed out".

1- Check rpc.stat is working and you can restart again , and you have to Restart NFS Services also 

Stop : 

# service nfslock stop
# service nfs stop
# service portmap stop
# umount /proc/fs/nfsd
 Start :
# service portmap start
# service nfs start
# service nfslock start
# mount -t nfsd nfsd /proc/fs/nfsd

Please follow the order, also note that when you restart the NFS service the server could hang at most for 1 minute.

Finally you should Reboot your server.


Thank you
Osama Mustafa


출처 : http://osamamustafa.blogspot.kr/2013/02/ora-27086-unable-to-lock-file-already.html

반응형
반응형

分类: Linux


修改时间 21-NOV-2011     类型 BULLETIN     状态 PUBLISHED 

Applies to:

Oracle Server - Enterprise Edition - Version: 8.1.5.0 to 11.1.0.6 - Release: 8.1.5 to 11.1
Information in this document applies to any platform.

Purpose

The purpose of this bulletin is to assist support analysts in understanding and 
resolving the stranded dba_2pc_entries.

Scope and Application

The intended audience are support analysts having good experience on distributed
databases.

How To Resolve Stranded DBA_2PC_PENDING Entries


Contents

1. Problem Description
2. Solutions
2.1 Dba_2pc entries without a corresponding transaction
2.2 Distributed transaction without corresponding dba_2pc entries
2.3 How to PURGE the DISTRIBUTED transaction in PREPARED state, when COMMIT
or ROLLBACK FORCE hangs ?, where we have entries for both Distributed
transaction and dba_2pc entries.

1. Problem Description:
=======================

As a result of a failed commit of a distributed transaction, some entries can
be left in dba_2pc views, i.e. dba_2pc_pending and dba_2pc_neighbors. The RECO
process checks these views to recover the failed txn. However, in some cases
RECO cannot perform. the recovery. One cause is that all sites involved in the
transaction not being accessible at the same time. Another cause is dba_2pc
views being inconsistent with the transaction table, which is the topic of
this article. This cause can further be classified as follows:

1. dba_2pc views have entries for a non-existent distributed transaction

2. There is a distributed transaction for which there are no entries in
dba_2pc views

3. How to PURGE the DISTRIBUTED transaction in PREPARED state, when COMMIT
or ROLLBACK FORCE hangs ?, where we have entries for both Distributed
transaction and dba_2pc entries.

Solutions to each subclass is provided in the rest of the article.


2. Solutions:


2.1 Dba_2pc entries without a corresponding transaction


In this case dba_2pc views show distributed transactions but there are no txns
in reality. If the state of the transaction is committed, rollback forced or
commit forced then this is normal and it can be cleaned up using

dbms_transaction.purge_lost_db_entry

However, if the state of the transaction is PREPARED and there is no entry in
the transaction table for it then this entry can be cleaned up manually as
follows:


set transaction use rollback segment SYSTEM;
delete from sys.pending_trans$ where local_tran_id = ;
delete from sys.pending_sessions$ where local_tran_id = ;
delete from sys.pending_sub_sessions$ where local_tran_id = ;
commit;

Example:
--------
The following query reports a dist. txn. in prepared state
select local_tran_id, state from dba_2pc_pending;
LOCAL_TRAN_ID STATE
---------------------- ----------------
1.92.66874 prepared

Given that a transaction id is composed of triple,
'1.92.66874' is located in rollback segment# 1. To find out the list of
active transactions in that rollback segment, use:

SELECT KTUXEUSN, KTUXESLT, KTUXESQN, /* Transaction ID */
KTUXESTA Status,
KTUXECFL Flags
FROM x$ktuxe
WHERE ktuxesta!='INACTIVE'
AND ktuxeusn= 1; <== this is the rollback segment#

no rows selected

It is not possible to rollback force or commit force this transaction.


rollback force '1.92.66874';

ORA-02058: no prepared transaction found with ID 1.92.66874

Hence, we have to manually cleanup that transaction:


set transaction use rollback segment SYSTEM;

delete from sys.pending_trans$
where local_tran_id = '1.92.66874';

delete from sys.pending_sessions$ where local_tran_id = '1.92.66874';

delete from sys.pending_sub_sessions$ where local_tran_id = '1.92.66874';

commit;


2.2 Distributed transaction without corresponding dba_2pc entries

In this case dba_2pc views are empty but users are receiving distributed txn
related errors, e.g. ORA-2054, ORA-1591. Normally such a case should not appear
and if it is reproducible a bug should be filed. Here is the list of several
alternative solutions that can be used in this case:

a. Perform. incomplete recovery
b. Truncate the objects referenced by that transaction and import them
c. Use _corrupted_rollback_segments parameter to drop that rollback segment
d. Insert dummy entries into dba_2pc views and either commit or rollback
force the distributed transaction

The first three solutions are discussed in Backup and Recovery manuals and in
the notes referred above. In the 4th solution a dummy entry is inserted into
the dictionary so that the transaction can be manually committed or rolled back.
Note that RECO will not be able to process this txn and distributed txn recovery
should be disabled before using this method. Furthermore, please take a BACKUP
of your database before using this method.

The stranded entries is the cause of ORA-01591 so we need to
clear the stranded entries by purging them using

execute DBMS_TRANSACTION.PURGE_LOST_DB_ENTRY('transanction_id');


The following example describes how to diagnose and resolve this case. Suppose
that users are receiving


ORA-1591: lock held by in-doubt distributed transaction 1.92.66874

and the following query returns no rows:


select local_tran_id, state from dba_2pc_pending
where local_tran_id='1.92.66874';

no rows selected

Furthermore querying the rollback segment shows that 1.92.66874 remains in
prepared state


SELECT KTUXEUSN, KTUXESLT, KTUXESQN, /* Transaction ID */
KTUXESTA Status,
KTUXECFL Flags
FROM x$ktuxe
WHERE ktuxesta!='INACTIVE'
AND ktuxeusn= 1; /* <== Replace this value with your txn undo seg#
Which is displayed in the first part of
the transaction ID */

KTUXEUSN KTUXESLT KTUXESQN STATUS FLAGS
---------- ---------- ---------- ---------------- ------------------------
1 92 66874 PREPARED SCO|COL|REV|DEAD


Trying to manually commit or rollback this transaction


commit force '1.92.66874';

ORA-02058: no prepared transaction found with ID 1.92.66874

raises ORA-02058 since dba_2pc views are empty. In order to use commit force or
rollback force a dummy record should be inserted into pending_trans$ as follows:


alter system disable distributed recovery;

insert into pending_trans$ (
LOCAL_TRAN_ID,
GLOBAL_TRAN_FMT,
GLOBAL_ORACLE_ID,
STATE,
STATUS,
SESSION_VECTOR,
RECO_VECTOR,
TYPE#,
FAIL_TIME,
RECO_TIME)
values( '1.92.66874', /* <== Replace this with your local tran id */
306206, /* */
'XXXXXXX.12345.1.2.3', /* These values can be used without any */
'prepared','P', /* modification. Most of the values are */
hextoraw( '00000001' ), /* constant. */
hextoraw( '00000000' ), /* */
0, sysdate, sysdate );

insert into pending_sessions$
values( '1.92.66874',/* <==Replace only this with your local tran id */
1, hextoraw('05004F003A1500000104'),
'C', 0, 30258592, '',
146
);

commit;

commit force '1.92.66874';


If commit force raises an error then note the errormessage and execute the
following:


delete from pending_trans$ where local_tran_id='1.92.66874';
delete from pending_sessions$ where local_tran_id='1.92.66874';
commit;
alter system enable distributed recovery;

Otherwise run purge the dummy entry from the dictionary, using

alter system enable distributed recovery;
connect / as sysdba
COMMIT;
Use following query to retrieve the value for such _smu_debug_mod parameter:

col Parameter for a20
col "Session Value" for a20
col "Instance Value" for a20

SELECT a.ksppinm "Parameter",b.ksppstvl "Session Value",c.ksppstvl "Instance Value"
FROM x$ksppi a, x$ksppcv b, x$ksppsv c
WHERE a.indx = b.indx AND a.indx = c.indx AND a.ksppinm = '_smu_debug_mode'
/


-- set it temporarily to 4:


alter system set "_smu_debug_mode" = 4; /* if automatic undo management
is being used */
-- in 9.2x alter session can be used instead.

commit; /* this is to prevent the ORA-01453 in purge_lost_db_entry call */

exec dbms_transaction.purge_lost_db_entry( '1.92.66874' );

SQL> commit;

SQL> alter system set "_smu_debug_mode" = ;

SQL> commit;


2.3 How to PURGE the DISTRIBUTED transaction in PREPARED state, when COMMIT
or ROLLBACK FORCE hangs ?, where we have entries for both Distributed
transaction and dba_2pc entries.


ORA-01591: lock held by in-doubt distributed transaction 44.88.85589

The row exist from dba_2pc_pending & Rollback segment


SQL> SELECT LOCAL_TRAN_ID,STATE FROM DBA_2PC_PENDING;

LOCAL_TRAN_ID STATE
----------------- -----------
44.88.85589 prepared


SQL> SELECT KTUXEUSN, KTUXESLT, KTUXESQN, /* Transaction ID */
KTUXESTA Status,
KTUXECFL Flags
FROM x$ktuxe
WHERE ktuxesta!='INACTIVE'
AND ktuxeusn= 44; /* <== Replace this value with your txn undo seg#
Which is displayed in the first part of
the transaction ID */

KTUXEUSN KTUXESLT KTUXESQN STATUS FLAGS
---------- ---------- ---------- ---------------- ------------------------
44 88 85589 PREPARED SCO|COL|REV|DEAD


SQL> Commit force 44.88.85589;
SQL> rollback force 44.88.85589;


Executing COMMIT or ROLLBACK FORCE hangs

The wait event is ""free global transaction table entry"


Purging the transaction should fail with below error:


EXECUTE DBMS_TRANSACTION.PURGE_LOST_DB_ENTRY('44.88.85589');
BEGIN DBMS_TRANSACTION.PURGE_LOST_DB_ENTRY('44.88.85589'); END;

*
ERROR at line 1:
ORA-06510: PL/SQL: unhandled user-defined exception
ORA-06512: at "SYS.DBMS_TRANSACTION", line 94
ORA-06512: at line 1


Solution:
--------

You have to implement both the solution :

2.1 Dba_2pc entries without a corresponding transaction
2.2 Distributed transaction without corresponding dba_2pc entries

1.

delete from sys.pending_trans$ where local_tran_id = '44.88.85589';
delete from sys.pending_sessions$ where local_tran_id = '44.88.85589';
delete from sys.pending_sub_sessions$ where local_tran_id ='44.88.85589';
commit;


2. Now insert the dummy record as explained in section:

2.2 Distributed transaction without corresponding dba_2pc entries
commit;

3. Commit force '44.88.85589'

4. Purge the transaction:

exec dbms_transaction.purge_lost_db_entry('44.88.85589');


Note:126069.1 Manually Resolving In-Doubt Transactions: Different Scenario's

Still have questions ?

To discuss this information further with Oracle experts and industry peers, we encourage you to review, join or start a discussion via My Oracle Support Streams and Distributed Database Community


References

NOTE:100664.1 - Master Note for Troubleshooting Oracle Managed Distributed Transactions
NOTE:126069.1 - Manually Resolving In-Doubt Transactions: Different Scenarios


출처 : http://blog.itpub.net/38267/viewspace-713103/


반응형
반응형


1. cpu 및 실행 시간의 plan을 아래와 같이 수행 후


explain plan for

          select * from dual;


2. 해당 plan 내역 조회


select * from table(dbms_xplan.display);


time(수행시간)이 나오지 않고


plan_table is old version 


에러가 뜨면 나타 나지 않을 때는


조치 방법

1. 기존 테이블 삭제

    $> DROP TABLE PLAN_TABLE;


2. sqlplus 서버에 접속해서


    $> @?$ORACLE_HOME/rdbms/admin/utlxpls.sql 실행


완료


2에서 오류 발생시 조치 방법


# > sqlplus '/as sysdba' 접속


$> SELECT DBMS_METADATA.GET_DDL('TABLE','PLAN_TABLE$','SYS') FROM DUAL;


위의 query 나온 결과에서


SYS 와 $ 표시를 삭제하고


해당 계정에서 실행하면 새로운 PLAN 테이블이 생성되고


time도 정상적으로 나온다. 


* EXPLAIN PLAN 시 이름 주고 조회하기


EXPLAIN PLAN SET STATEMENT_ID='TSH' FOR

SELECT *

FROM   emp e, dept d

WHERE  e.deptno = d.deptno

AND    e.ename  = 'SMITH';


SELECT * FROM TABLE(DBMS_XPLAN.DISPLAY(NULL, 'TSH', 'ALL', NULL));


1 번째 인자 : PLAN TABLE 명으로 NULL 명시해도 됨(기본 사용)

2 번째 인자 : EXPLAIN PLAN SET STATEMENT_ID 에서 사용한 이름 (여러명이 동시 사용시에는 이름이 나와야 정확함) -> NULL은 마지막 값 조회

3. 번째 인자 : DBMS_XPLAN.DISPLAY 에서 상세하게 볼 때 사용하는 옵션으로 TYPICAL, ALL, BASIC 등이 있음


참고 : http://web-dev.tistory.com/662


참고 사이트 : http://stackoverflow.com/questions/25613444/how-to-create-explain-plan-table-on-amazon-rds-database

반응형
반응형


던파를 잘하다가 어느날 갑자기


Themida


A debugger has been found running in your system.

Please, unload it from memory and restart your program.


직역을 하자면


당신의 시스템에서 실행중 디버거가 발견되었습니다.

메모리상에서 제거후 다시 프로그램을 실행하세요


더 쉽게 말하자면


메모리상에 존재해서는 안되는 무언가가 있어서 실행이 안되는거에요...


아우... 아무리 검색해도 다들 이상한 얘기들만 존재하고 있었다.


해결?


해결은 했다...


우선 바이러스 백신 프로그램(흔히 사용하는 v3, 알약, 바이러스 체이서등 )으로는 찾을수가 없어서


escan Tool kit 녀석을 받아서 처리하는 방법이 있었다.


1. 회사 홈페이지로 가서 tool kit을 다운로드 한다.


주소 : http://www.escan.co.kr/


2. 프로그램을 실행후 


바탕화면에 생기는 툴킷 프로그램을 실행하여


3. 업데이트를 먼저 수행하자


 - 아래 화면에서 조치 밑에 업데이트를 눌러 최신의 정보를 업데이트 하자

   (물론 사이트에서 받아서 설치했다면 최신의 내용이 포함되어 있다...)


4. 검사 및 지우기

    - 아래의 붉은 색으로 표기된 부분을 모두 체크 후에 검사 및 지우기를 실행하여 PC에 사용자 모르게 설치된 악성코드들을 모두 처리하자


5. 리부팅

   - 검사 완료했으면 파일들을 모두 지워졌지만, 메모리 상에서는 해당 정보가 정상적으로 unload 되지 않았기 때문에 리부팅하여 그 파일들이 다시 로딩되지 않게 하는 것이다.


던파를 하다가 오류가 나서 해결한 결과를 올립니다.


사실 피씨에 가장 문제가 되는건 피씨 포맷을 하는거지만


고치는 방법을 통해 쉽게 해결했으면 하네요 ~


즐던하세요 ~


반응형

+ Recent posts